
Today, I’d like to take an example iOS app written with an MVC architecture and show you what the example would be with a Clean Swift architecture. The example I’ve chosen to use is the Quiz app from chapter 1 of the 3rd edition of iOS Programming: The Big Nerd Ranch Guide.
The Quiz is a simple app that is like flash cards. It looks like this:
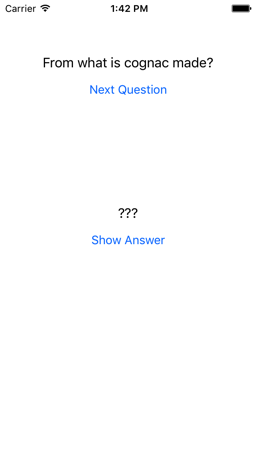
The Show Answer button will reveal the answer to the question and tapping on the Next Question button will display the next question.
The MVC Example
Click here to download the source code for the MVC version from Big Nerd Ranch’s site. The code is actually from the 6th edition. Let’s look at the relevant code. Here’s the code for the view controller, ViewController.swift:
import UIKit

class ViewController: UIViewController {

   @IBOutlet var questionLabel: UILabel!
   @IBOutlet var answerLabel: UILabel!

   let questions: [String] = [
       "From what is cognac made?",
       "What is 7+7?",
       "What is the capital of Vermont?"
   ]
   let answers: [String] = [
       "Grapes",
       "14",
       "Montpelier"
   ]
   var currentQuestionIndex: Int = 0

   override func viewDidLoad() {
       super.viewDidLoad()
       questionLabel.text = questions[currentQuestionIndex]
   }

   @IBAction func showNextQuestion(_ sender: UIButton) {
       currentQuestionIndex += 1
       if currentQuestionIndex == questions.count {
           currentQuestionIndex = 0
       }

       let question: String = questions[currentQuestionIndex]
       questionLabel.text = question
       answerLabel.text = "???"
   }

   @IBAction func showAnswer(_ sender: UIButton) {
       let answer: String = answers[currentQuestionIndex]
       answerLabel.text = answer
   }

}
That’s really the only source file we need to look at. The view part of MVC is in a storyboard that is just a simple view controller with 2 labels and 2 buttons. The 2 labels are connected to the 2 outlets you see above and the 2 buttons are connected to the 2 actions you see above (with the @IBAction attribute). The class of the view controller in the storyboard is set to ViewController.
So basically, all the functionality of the app is crammed into the view controller. Granted, this is an example from a book designed to teach some basic principles, so it was not meant to demonstrate a good architecture. That being said, it is not uncommon to see code similar to this, even in professionally developed apps in large companies. The reason for this, I believe is that so many of our examples don’t touch on topics like architecture, even from Apple. It’s up to the developer to discover the error of their ways and start thinking about architecture.
MVC: Model
The model is put directly into the view controller and consists of an array of strings for the questions and an array of strings for the answers. There is also currentQuestionIndex to keep track of the current question. There is no model object to speak of as there typically would be in a true MVC implementation. Those three items would probably be separated into a FlashCardDeck class that the view controller talked to.
MVC: View
The view is entirely in the storyboard and all it really does it forward events to the controller. It’s actually pretty good for this case.
MVC: Controller
The controller is implemented in the ViewController class. It’s directly manipulating the model and in fact the model is part of the class. It’s also directly manipulating the view in response to view events. In a more truer implementation of MVC, the controller would be more separated from the view and call methods on the view to make these changes.
MVC: Summary
In MVC, the view takes events and and feeds them to the controller. The controller updates the model and the view listens for events from the model to update itself or just displays what the controller tells it to. The controller would typically do this after updating the model.
Testing this would be rather difficult. It is simplified by that fact that everything is in one file, but you would have to instantiate the view and test everything together. If there was a database or network to talk to this would further complicates things and make your tests slow. There’s really no way to test anything in isolation. The example is not really a true representation of MVC, but as I’ve previously discussed, the implementation is a common representation of what many iOS apps do.
The Clean Swift Example
Before we start on the Clean Swift example, let me first say that for such a simple example, using an architecture such as Clean Swift, VIPER, etc. is overkill. However, if you are on a large team working on a large project (say a professional level flash card app targeted at professionals like lawyers studying for the Bar exam), you absolutely need some kind of architecture. Click here to download the Clean Swift example.
Clean Swift: Project Structure
Here’s a screenshot of the project structure:
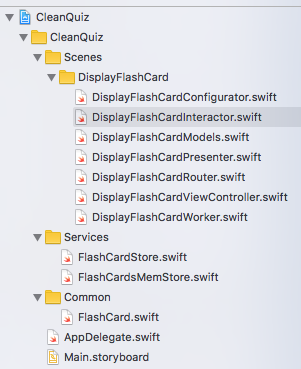
Notice that the project structure is built around the scenes (or screens) in your app. In the Clean architecture, your app is built around the use cases of your app and the project structure reveals the nature of the app. In a traditional MVC project your code is organized around and grouped by models, views, and controllers. You can’t tell at all what kind of app it is. Looking at the structure, you can see that we have one scene in the app, that displays a flash card. There’s also some common code such as our FlashCard entity, and a service to manage the storage of our flash cards.
Clean Swift: Common Code
Let’s start with the common code. We just have one file that looks like this:
struct FlashCard {
    let question: String
    let answer: String
}
That’s it. It just contains the data for a flash card which consists of the question and the answer.
Clean Swift: Services
To manage the storage of our flash cards, we have one common service. All of the rest of the code in the app accesses it through the FlashCardsStore protocol:
protocol FlashCardsStore {
    func fetchFlashCards(completionHandler: @escaping (FlashCardsStoreResult) -> Void)
}

enum FlashCardsStoreResult {
    case cards([FlashCard])
    case error(FlashCardsStoreError)
}

enum FlashCardsStoreError: Error {
    case unknownError
}
It consists of one function to fetch all the cards that calls a completion handler with the result which is either the fetched cards or an error. For this simple example, we don’t really have any errors, but we show one just to show the possibilities. Our FlashCardsStore has one implementation, FlashCardsMemStore:
class FlashCardsMemStore: FlashCardsStore {
    let flashCards = [
        FlashCard(question: "From what is cognac made?", answer: "Grapes"),
        FlashCard(question: "What is 7+7?", answer: "14"),
        FlashCard(question: "What is the capital of Vermont?", answer: "Montpelier"),
    ]

    func fetchFlashCards(completionHandler: @escaping (FlashCardsStoreResult) -> Void) {
        DispatchQueue.global().async {
            completionHandler(.cards(self.flashCards))
        }
    }
}
There’s only one place in the app that cares about this class and that’s where it’s instantiated. The rest of the app doesn’t know how the cards are stored, nor does it care. This makes is really easy to replace our store with something else and to test the rest of the apps interaction with the store by replacing it with a mock.
Clean Swift: Configuration
Now, let’s turn our attention to how a scene is brought to life and everything is connected together. When the app is loaded it instantiates the initial view controller in the Main storyboard. In this case it is the DisplayFlashCardViewController. Here’s what the start of the class looks like:
class DisplayFlashCardViewController: UIViewController, DisplayFlashCardViewControllerInput {
   var output: DisplayFlashCardViewControllerOutput!
   var router: DisplayFlashCardRouter!

   @IBOutlet weak var questionLabel: UILabel!
   @IBOutlet weak var nextQuestionButton: UIButton!
   @IBOutlet weak var answerLabel: UILabel!
   @IBOutlet weak var revealAnswerButton: UIButton!

   override func awakeFromNib()
   {
       super.awakeFromNib()
       DisplayFlashCardConfigurator.sharedInstance.configure(viewController: self)
   }
You see it has outlets for the question label, next question button, answer label, and the reveal answer label. I’ll get to the output and router properties later. For now look at the awakeFromNib method. This method is called after the view controller is instantiated from the storyboard. In this case, the first thing we do is instantiate the configurator, passing it the view controller. The configurator is responsible for connecting up all the different objects in the scene. Let’s look at it:
class DisplayFlashCardConfigurator {
   static let sharedInstance = DisplayFlashCardConfigurator()

   private init() {}

   func configure(viewController: DisplayFlashCardViewController) {
       let router = DisplayFlashCardRouter()
       router.viewController = viewController

       let presenter = DisplayFlashCardPresenter()
       presenter.output = viewController

       let interactor = DisplayFlashCardInteractor()
       interactor.output = presenter

       viewController.output = interactor
       viewController.router = router
   }
}
The configure method just connects up our View -> Interactor -> Presenter data flow for the scene. The view talks to the interactor via its output property. The interactor talks to the presenter via its output property and the presenter talks to the view via its output property. The router and view are also connected together. The view talks to the router to navigate to other scenes in the app. Since our Quiz app only has one scene, the router doesn’t do anything and I won’t cover it.
Clean: View -> Interactor: Loading Flash Cards
Everything is hooked up now and our view controller will be loaded. Let’s see what happens next back in our DisplayFlashCardViewController:
override func viewDidLoad() {
   super.viewDidLoad()
   fetchFlashCardOnLoad()
}

private func fetchFlashCardOnLoad() {
   // NOTE: Ask the Interactor to do some work
   let request = DisplayFlashCard.Request.FetchFlashCards()
   output.fetchFlashCards(request: request)
}
Once the view has been loaded from the storyboard, viewDidLoad is called. It calls fetchFlashCardOnLoad() to fetch the flash card to display. fetchFlashCardOnLoad() creates a FetchFlashCards request object and through its output property tells the interactor to fetch the flash cards with the options specified in the request. In this case there aren’t any options but you could imagine such things as a limit to the number of cards to fetch, etc. Up above you saw the output property, which looks like this:
var output: DisplayFlashCardViewControllerOutput!
Here’s DisplayFlashCardViewControllerOutput:
protocol DisplayFlashCardViewControllerOutput {
   func fetchFlashCards(request: DisplayFlashCard.Request.FetchFlashCards)
   func fetchNextFlashCard(request: DisplayFlashCard.Request.FetchNextFlashCard)
   func revealAnswer(request: DisplayFlashCard.Request.RevealAnswer)
}
This is the protocol through which the view controller will talk to the interactor. The interactor will implement this protocol (or some mock interactor during testing will implement it). Let’s look at the relevant parts of DisplayFlashCardsInteractor:
class DisplayFlashCardInteractor: DisplayFlashCardInteractorInput {
   var output: DisplayFlashCardInteractorOutput!
   var worker = DisplayFlashCardWorker(cardsStore: FlashCardsMemStore())

   private var flashCards: [FlashCard] = [] {
   didSet {
       if flashCards.count > 0 {
           cardIndex = 0
       }
       else {
           cardIndex = nil
       }
   }

   private var cardIndex: Int?

   func fetchFlashCards(request: DisplayFlashCard.Request.FetchFlashCards) {
       worker.fetchFlashCards { (result: FlashCardsStoreResult) in
           DispatchQueue.main.async {
               switch result {
                   case .cards(let cards):
                       self.flashCards = cards
                       guard let card = self.currentCard else { return }
                       let response = DisplayFlashCard.Response.FetchFlashCard(
                           card: self.hideAnswer(card: card),
                           isLastCard: self.onLastCard(),
                           isAnswerHidden: true)
                       self.output.presentFlashCard(response: response)

                   case .error(let error):
                       self.output.presentError(error)
               }
           }
       }
   }
The first thing to notice is that DisplayFlashCardInteractor implements the DisplayFlashCardInteractorInput protocol. This looks exactly like the DisplayFlashCardViewControllerOutput protocol. You set the output of the view controller to the object that implements an input protocol that looks the same. DisplayFlashCardInteractor then has some code to manage the flash cards in the scene and the fetchFlashCards() method. fetchFlashCards just tells a worker to fetch the flash cards. The worker will call the closure with a result once its finished. The worker was instantiated with this line:
var worker = DisplayFlashCardWorker(cardsStore: FlashCardsMemStore())
This is the only place where we know what class the cards store actually is. You could supply the interactor with another worker that uses another completely different cards store. The Interactor won’t care. I won’t go into the worker here, but it just talks to the store and when it gets cards back from the store, it calls the closure with a FlashCardsStoreResult, which looks like this:
enum FlashCardsStoreResult {
   case cards([FlashCard])
   case error(FlashCardsStoreError)
}
So you either get back the cards or you get an error. If the interactor gets an error back from the worker, it just tells the presenter through its output property to present the error. The presenter will in turn tell the view controller to display the error. Again, I won’t cover that here because it is similar to what we will be doing for the displaying the cards.
Clean: Interactor -> Presenter - Display a Flash Card
If we get back some cards, the interactor saves the cards, sets up the initial state for the cards and then creates a response object that will be sent though its output property to the presenter. Our response object in this case, contains the first card with its answer hidden, whether or not this is the last card, and whether or not the answer is hidden. The interactor then tells the presenter, through the output property, to present the flash card in a manner specified by the response object. Here’s the interactor’s output protocol:
protocol DisplayFlashCardInteractorOutput {
   func presentFlashCard(response: DisplayFlashCard.Response.FetchFlashCard)
   func presentError(_ error: FlashCardsStoreError)
}
And here’s DisplayFlashCardPresenter’s input protocol:
protocol DisplayFlashCardPresenterInput {
   func presentFlashCard(response: DisplayFlashCard.Response.FetchFlashCard)
   func presentError(_ error: FlashCardsStoreError)
}
Again, they match. Now let’s look at the relevant presenter code:
func presentFlashCard(response: DisplayFlashCard.Response.FetchFlashCard) {
   // NOTE: Format the response from the Interactor and pass the result back to the View
   let viewModel = DisplayFlashCard.ViewModel(questionText: response.card.question,
                                              answerText: response.card.answer,
                                              nextQuestionEnabled: !response.isLastCard,
                                              revealAnswerEnabled: response.isAnswerHidden)
   output.displayFlashCard(viewModel: viewModel)
}
The presenter takes the response from the interactor and creates a view model. The view model simply contains all the data the view controller needs as strings or other simple data types (bools in this case). The presenter should handle all the necessary formatting. Is this case, no formatting is required. Our view model looks like this:
struct ViewModel {
   let questionText: String
   let answerText: String
   let nextQuestionEnabled: Bool
   let revealAnswerEnabled: Bool
}
Its just the text to use for the question label, the text to use for the answer label, whether or not the next question button should be enabled, and whether or not the reveal answer button should be enabled.
Clean: Presenter -> View: Displaying a Card
The presenter then passes this view model to the view through its output property by calling displayFlashCard. Here’s the presenter output protocol:
protocol DisplayFlashCardPresenterOutput: class {
   func displayFlashCard(viewModel: DisplayFlashCard.ViewModel)
   func displayError(title: String, message: String)
}
This again will match exactly with the DisplayFlashCardViewControllerInput protocol, which is the input protocol for the view. Now let’s look at how the view implemented by DisplayFlashCardViewController, handles displayFlashCard:
func displayFlashCard(viewModel: DisplayFlashCard.ViewModel) {
   questionLabel.text = viewModel.questionText
   nextQuestionButton.isEnabled = viewModel.nextQuestionEnabled

   answerLabel.text = viewModel.answerText
   revealAnswerButton.isEnabled = viewModel.revealAnswerEnabled
}
The view is dumb. All it does is take the values from the view model and put them where they should go in the view.
Clean: Summary
That’s one complete cycle through the view, interactor, presenter data flow. The other ones are when the user taps the next questions button and the reveal answer button. I won’t cover those because the flow is similar. Just look at the code to see how they are handled.
Conclusion
Whew! That was a lot! You can now see why Clean Swift is overkill for our simple example and why some teams are reluctant to use it or others have strived to simplify it. At my new job, we are using a simpler version of the Clean architecture that is more of a cross between MVP and Clean, and it’s working pretty well. The app we are working on is very large and quite complicated. It’s a challenge to implement this architecture in some cases, but it definitely helps in knowing where functionality should be placed and what classes are responsible for certain behavior. It definitely helps in testing. We have no UI automation tests and all our units tests run in under 10 seconds. Our unit tests also test the UI.
Using an architecture like Clean Swift takes practice and discipline, but take the time to understand it. It will pay off in your understanding of applying an architecture to your next project. That architecture may or may not be Clean Swift. Do what works for you and your team. I’d say start with the Clean architecture and adapt it to your needs. This article has been a long time coming and I apologize for the delay. It was quite a challenge to write with all the moving parts and with my inexperience with Clean Swift as well. Please comment below or contact me directly if you have any questions or have some topics you would like me to cover in future posts.